I’m obsessed with Nanami’s calm, office-sure vibe — it’s a goldmine for moody, cinematic cosplay photoshoots. I’ve recreated his aesthetic multiple times on a shoestring budget, and I want to share the exact tricks and cheap swaps I use to turn a tiny living room or a rented studio into a believable salaryman’s office without breaking the bank.
What makes Nanami’s office aesthetic so strong?
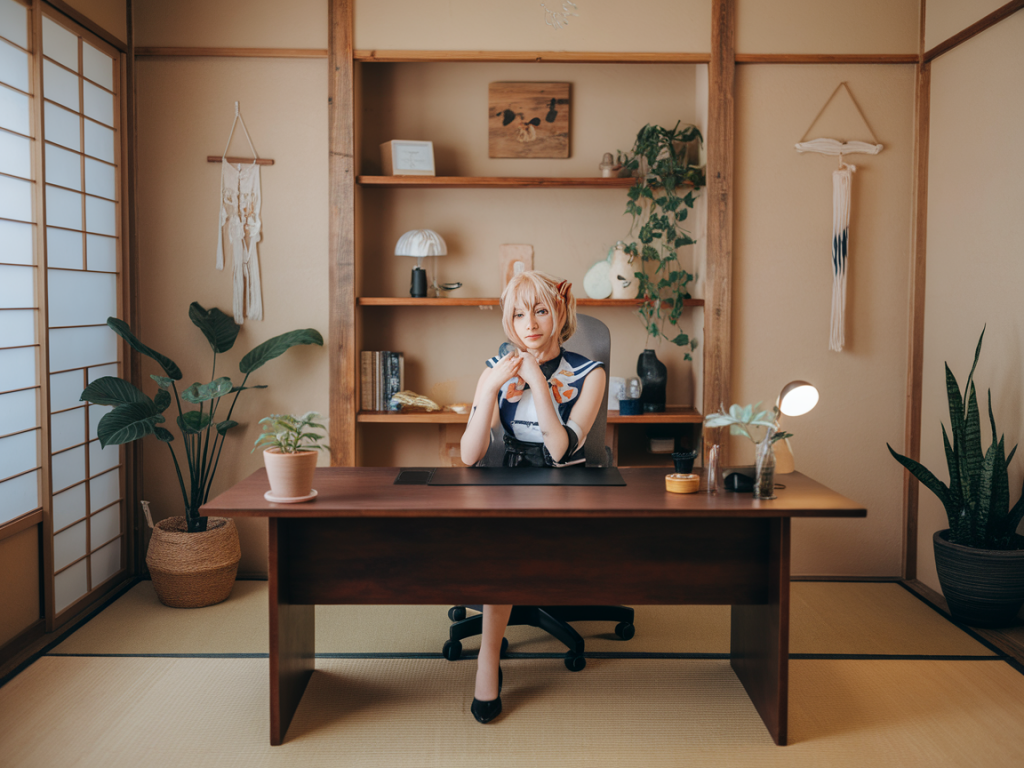
For me, it’s the quiet minimalism: tailored suit, muted color palette, vintage office gear and the small details that hint at routine and discipline. Think neat stacks of paper, a leather briefcase, a heavy brass pen, warm desk lighting, and those horizontal blinds casting shadows — the mood is all about order, restraint and subtle textures.
Key elements to recreate (and affordable swaps)
- The Suit: A slim-fit charcoal or dark gray suit is ideal. You don’t need tailored designer gear; I’ve used secondhand suits from thrift stores (Goodwill, local charity shops) and gotten great results after a trip to the dry cleaner and a quick press. For an instant upgrade, try H&M or Zara’s basic suits — they often have budget-friendly options.
- Shirt & Tie: Keep the shirt crisp white and the tie muted (burgundy, navy or dark brown). A narrow knit tie imitates the understated look. I’ve bought ties from Primark or Amazon for under £10 that photograph well.
- Glasses: Thin, gold-rimmed glasses are essential for Nanami’s expression. Affordable replica frames from retailers like Warby Parker (if you’re in the US) or ASOS/Shein can work. I’ve found retro gold frames for under £15 on eBay.
- Leather Briefcase / Bag: Real leather can be pricey — faux leather satchels or vintage styles from charity shops give the right silhouette. A structured faux leather messenger bag from Amazon or Etsy does the job perfectly.
- Props (pens, ledger, watch): A metal fountain pen or brass pen elevates the table. Old ledger books or composition notebooks can be aged with tea stains. A classic wristwatch (even a cheap quartz watch with a leather strap) is an easy visual cue.
- Desk & Chair: A simple wooden desk or table works better than modern glass. IKEA’s LINNMON table or old school desks from Facebook Marketplace are inexpensive options. A leather or faux-leather chair gives the right silhouette.
- Lighting: A warm desk lamp (Ikea’s work lamps are cheap and powerful) and window blinds to create shadow lines are crucial. You can simulate blinds with narrow strips of cardboard or Venetian blind props if you don’t have a usable window.
DIY and budget-friendly prop ideas
Here are the DIY items I always make before a shoot:
- Stacked files and folder props: Buy plain manila folders in bulk, print minimal faux-doc headers (like “Client File”), and slightly distress the edges with sandpaper or diluted tea for authenticity.
- Vintage nameplate: Cut a rectangle from thick cardboard, spray-paint it brass or bronze, and handwrite a name in a serif font with a Sharpie. It reads well on camera from a distance.
- Desk blotter: Use a large piece of faux leather (available cheaply by the metre) to act as a desk pad; it immediately makes the surface appear professional.
- Blinds effect: Tape strips of black paper or use slatted cardboard across a light source to mimic the shadow pattern of blinds when you don’t have a real window.
Shooting tips: lighting, composition and mood
- Warm key light: Use a warm LED or incandescent desk lamp as your main light to recreate the soft, yellow office glow. Avoid flat flash — it kills mood.
- Backlight for rim light: Put another light behind the subject to separate them from the background. A cheap clamp lamp with a soft diffuser (a white pillowcase works) is enough.
- Blinds shadows: For cinematic shots, place a light source behind realistic blinds or your DIY strips to cast horizontal shadows across the subject’s face and desk. This gives instant drama.
- Depth and props: Place a few objects at varying distances from the camera — a stack of files in the foreground, the subject at mid-distance, a lamp behind — to create depth and a lived-in feel.
- White balance: Set your camera white balance to “Tungsten” or manually warm the tones if you want richer amber colors from an LED lamp.
- Camera settings: Shoot at a wide aperture (f/1.8–f/2.8) for shallow depth of field to keep the focus on the subject and blur the clutter into atmospheric shapes.
Wardrobe & styling notes I swear by
I treat the suit as a character prop — small imperfections add realism. Here’s how I style the outfit:
- Press the suit well, but leave the tie slightly askew or loosened at the top for naturalism — Nanami is precise, but not staged.
- Roll or wrap the sleeve subtly if you want to show watch or bandage details.
- Use minimal makeup: matte foundation to even skin tone, light powder to remove shine. Avoid heavy cosplayer makeup — the look is muted.
- Consider simple accessories: a narrow tie clip, plain cufflinks, and a pocket square muted in tone (cream or beige).
Budget breakdown (example)
| Item | Estimated cost (GBP) |
| Secondhand suit | £15–£40 |
| Shirt & tie | £10–£25 |
| Glasses (replica frames) | £10–£20 |
| Briefcase (faux leather) | £15–£30 |
| Desk lamp & clamp lamp | £10–£30 |
| DIY prop materials (cardboard, paint, faux leather) | £5–£15 |
| Misc (pencils, ledger book, folders) | £5–£10 |
| Total | £70–£180 |
Poses and expressions that sell the look
- Seated at the desk with one hand holding a pen over a ledger — chin slightly down, eyes focused past the frame. This reads as introspective and businesslike.
- Leaning against the desk with briefcase in hand and glasses slightly lowered — that knowing, tired-but-capable look is perfect.
- Standing by the window blinds with hands in pockets and half the face in shadow — great for silhouette and moody portraits.
- Close-up of fingers tapping a fountain pen or flipping through pages — detail shots help sell authenticity.
If you want, I can also create a printable pack (faux file headers, nameplate templates, ledger pages) that matches this aesthetic so you can download and assemble on a day-of shoot. I use similar resources on jujutsukaisen.co.uk for other cosplay setups — they save me so much prep time and keep things consistent across shoots.