I photograph a lot of cosplays for the site and for my own projects, and over the years I’ve picked up a handful of practical tricks that turn a good Jujutsu Kaisen costume into an image that really feels like it belongs inside the world of the series. Below I’ll walk you through lighting, posing, camera choices, makeup and editing — everything I personally consider when I want a polished, professional-looking cosplay shoot.
Know the vibe you want
Before you touch a camera, decide what mood you’re aiming for. Is your character brooding like Satoru Gojo with dramatic shadows? Energetic and action-packed like Yuji Itadori? Soft, melancholic, or supernatural? Your lighting, location, and poses should all support that central vibe. I usually make a small mood board on my phone with a few reference frames from the anime, screenshots of colors, and a couple of photos I admire. It helps keep the shoot cohesive.
Lighting: natural vs. artificial
Lighting is the single biggest factor that separates amateur shots from professional ones.
Natural light — Soft natural light is a cosplayer’s best friend. Overcast days give even, flattering light that’s ideal for close-ups and detail shots (e.g., makeup, costume textures). Golden hour (the hour after sunrise or before sunset) produces warm, directional light that works brilliantly for emotional portraits. When I shoot outdoors I avoid midday sun; it creates harsh shadows that are hard to control.
Artificial light — For dramatic, anime-like lighting, bring strobes or continuous LED panels. I use a Godox AD200 for portable strobes and Aputure 120d II for continuous light when I need consistent color and intensity. Use a softbox or an umbrella to soften light for portraits, and add a rim light behind the subject to separate them from the background — this is especially effective for characters like Nobara or Megumi where silhouette and presence matter.
Modifiers matter: reflectors, grids, and gels are small investments that multiply your creative control. A silver reflector will boost contrast; a white reflector yields softer fill. Gels (blue, purple, red) let you instantly mimic cursed energy or atmospheric lighting.
Camera settings and gear
You don’t need an expensive camera to get great results, but knowing your settings is crucial. I switch between a Sony a7 series mirrorless body and a Canon R for different projects, and I also shoot a lot on my iPhone 15 Pro when I want speed and portability.
| Situation | Aperture | Shutter | ISO |
| Close-up portraits (soft background) | f/1.8–f/2.8 | 1/125–1/250 | 100–400 |
| Full-body action (motion blur control) | f/4–f/5.6 | 1/500–1/2000 | 200–800 |
| Low light / indoor scenes | f/1.8–f/2.8 | 1/60–1/200 | 400–1600 |
For lenses, I love a fast 50mm or 85mm prime for portraits — they give that creamy bokeh that isolates the subject. A 24–70mm zoom is my workhorse for versatility. If your cosplay has dramatic movement (capes, hair, props), a 70–200mm can compress scenes and create dynamic backgrounds.
Posing: tell a story
Pose with intent. Each Jujutsu Kaisen character has signature mannerisms — study them and adapt poses that emphasize personality.
- Gojo: relaxed shoulders, confident tilt of the chin, hands near eyes (for his blindfold adjustment). Slight smirk.
- Yuji: open posture, energetic forward lean, fists or running motion to sell movement.
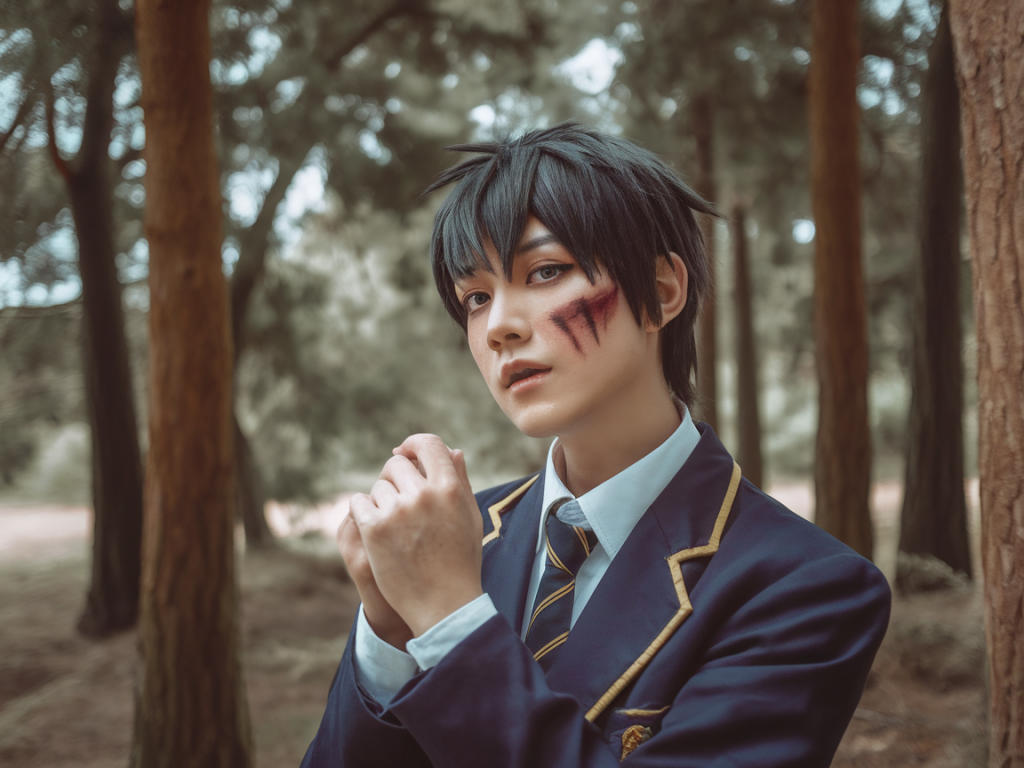
- Megumi: closed-off stance, hands in pockets or forming shikigami gestures, low eye contact.
- Nobara: bold, angular poses — hammer or nails held deliberately, head slightly cocked.
Use small directional cues: ask your model (or yourself) to shift weight onto one foot, look over a shoulder, breathe out to relax the jaw. Capture both static and dynamic frames — slow, contemplative shots and quick bursts with movement. I always take a few frames while the cosplayer transitions between poses; those candid moments often have the most life.
Makeup, wig and prop considerations
Cosplay makeup should read on camera: accentuate contours slightly more than everyday makeup, and use matte powders to avoid shine under lights. For close-ups, deepen eyebrow shapes and define the eyes — false lashes can help anime-style eyes read on camera.
Wig styling should stand up to movement. I use lightweight hairspray and flexible wig glue near the hairline for stability, and bring spare bobby pins. Props should be tested in advance for weight and safety; make sure anything you plan to swing or pose with won’t damage the costume or people around you.
Backgrounds and locations
Backgrounds set context. For modern urban characters, concrete alleys, rooftops, or subway stations work great. For more mystical vibes, search for parks with fog, old staircases, or locations with interesting light leaks. I often scout locations on Google Street View first.
If you can’t find a location, use portable backdrops or a roll of vinyl; you can also photograph on a neutral background and composite a background in post.
On-set workflow: speed and backup
My workflow minimizes stress during the shoot:
- Charge batteries and format memory cards before leaving home.
- Set a baseline exposure and take a test shot of the scene with a color checker if possible.
- Shoot in RAW for maximum flexibility in editing.
- Take regular breaks for costume adjustments and to review shots on the camera screen.
- Back up images to a phone or laptop as soon as practical, especially for long shoots.
Editing: color, mood and finishing touches
I edit in Lightroom and finalize in Photoshop. Mobile editors like Snapseed or Lightroom Mobile can also produce excellent results if you’re shooting on a phone.
Key editing steps I use:
- Correct exposure and white balance first.
- Adjust contrast and clarity: increase clarity sparingly — too much makes skin look harsh.
- Color grading: push tones toward the palette that matches your reference (cool blues/purples for cursed energy, warm oranges for golden hour).\li>
- Dodge and burn: subtly sculpt the face and costume to emphasize depth.
- Sharpening and noise reduction: apply selectively — eyes and texture areas get more sharpening, skin gets smoothing.
- Compositing: add smoke overlays, energy glows, or particle brushes in Photoshop for supernatural effects. A soft blue glow with a layer blend mode like Screen can mimic cursed technique energy really well.
Examples and presets
I often build a few Lightroom presets for different characters: one for high-contrast moody shots, one for warm cinematic looks, and one for clean, high-key portraits. Use presets as a starting point and tweak per image — skin tones and exposure vary too much for a single preset to work universally.
If you want quick results, I recommend looking at presets from creators like Mastin Labs for filmic tones or VSCO for cinematic color — then tweak to fit your cosplay.
Photographing a Jujutsu Kaisen cosplay is about balancing fidelity to the character with creative interpretation. Whether you’re shooting on a phone or a mirrorless camera, a few deliberate lighting choices, intentional poses, and careful editing will elevate your images from screenshots to storytelling. If you want, send over a few of your images and I can give specific notes tailored to your costume and character — I love helping fellow cosplayers level up their photos.